PDF annotation tool
The PDF annotation tool lets the board annotate floor plans and other PDF documents right in the browser: draw an area over a moisture-damage spot, drop a pin on a floor drain, and attach a label, a note and tags to each mark. It is a natural fit for recording annual-inspection findings, defect locations and renovation progress on floor plans.
You will find the tool in the left-hand menu under Tools → PDF annotation tool. It is available to board admins, and everything you save is scoped to your housing association: one association’s workspaces, documents and annotations are never visible to another association’s users.
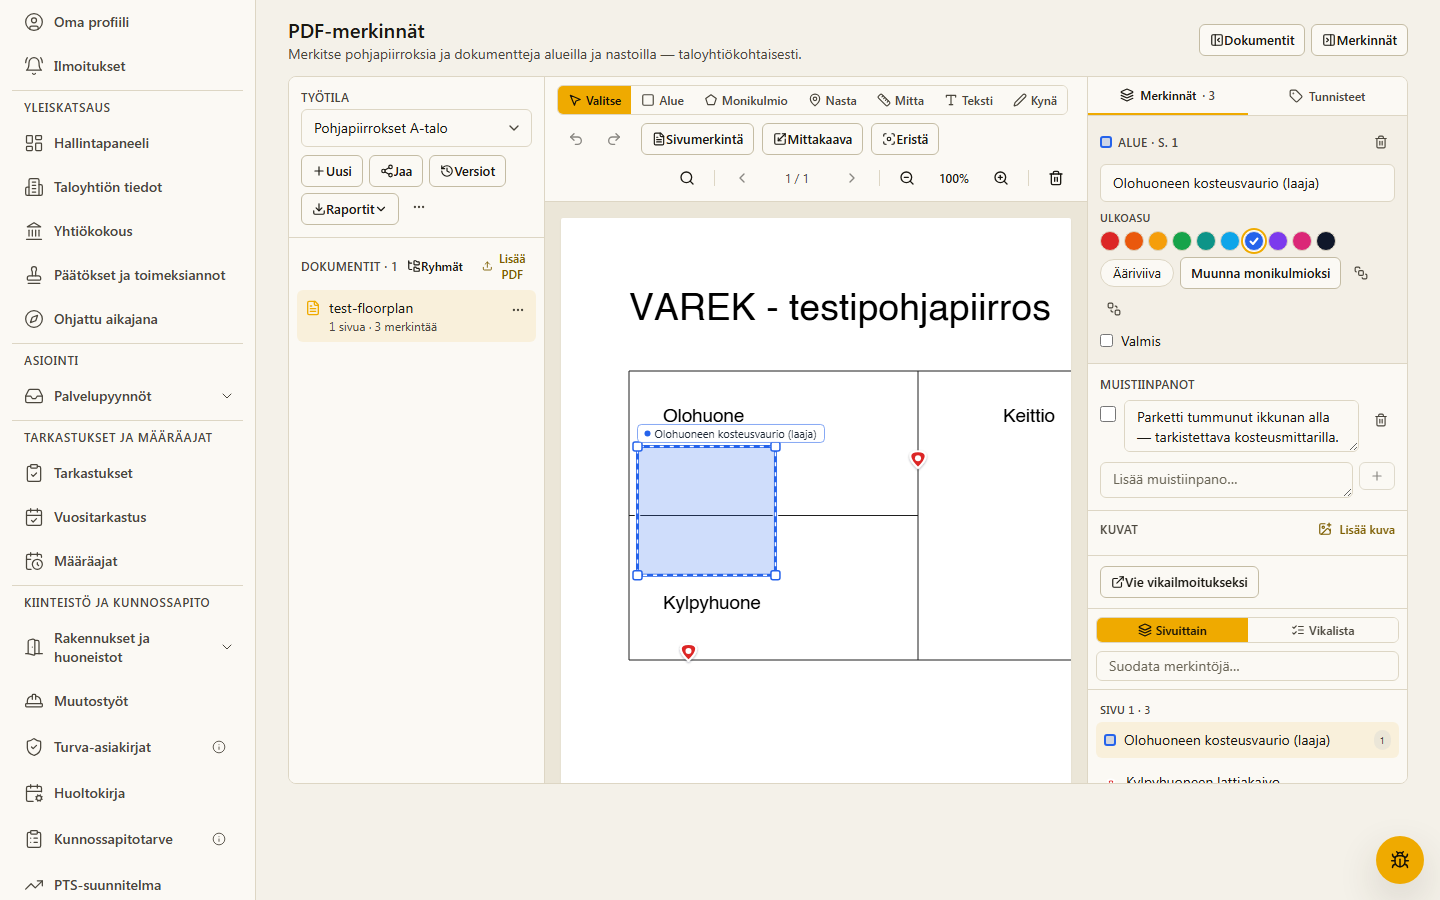
On desktop, the side panels can be hidden from the Documents and Marks buttons in the header row, giving the drawing nearly the full width of the screen — the choice is remembered for your next visit. On a phone, the same buttons open the panels as overlays on top of the drawing.
Workspaces and documents
Section titled “Workspaces and documents”Annotations are organised into workspaces — for example “Floor plans, building A” or “Annual inspection 2026”. Create a workspace with the New button in the left panel; rename or delete one from the row’s ⋯ menu.
Add PDF documents to a workspace with the Add PDF button. Multi-page PDFs are supported: move between pages with the toolbar arrows, and every annotation stays attached to the page it was drawn on. Zoom in and out with the toolbar zoom buttons or with the mouse wheel over the drawing — the view zooms towards the point under the cursor. Drag with the mouse to pan a zoomed-in view while the Select tool is active; Shift+wheel also scrolls horizontally.
Drawing groups
Section titled “Drawing groups”A large workspace’s documents can be organised into drawing groups — for example “Floors”, “Facades” and “Electrical”. Create and manage groups from the Groups button in the Documents header (rename, recolour via the colour dot, delete — documents remain). A document is assigned to a group from its row’s ⋯ menu. Groups show in the document list as coloured, collapsible headers; ungrouped documents are listed last.
Annotations: areas, polygons and pins
Section titled “Annotations: areas, polygons and pins”The toolbar offers seven tools:
- Select — click an existing annotation to edit it.
- Area — drag with the mouse to draw a rectangle (e.g. a damaged area, a room under renovation).
- Polygon — draw a free-form area by clicking its corner points one by one; close the shape by clicking the first point, double-clicking, or pressing Enter (Esc cancels). Ideal for slanted walls and irregular rooms.
- Pin — click to drop a point marker (e.g. a single defect, a measurement point). A preview of the marker follows the mouse pointer before you click.
- Measure — drag to draw a measurement line; its real-world length in meters shows next to the line once the document has a scale set (see Measurements and scale).
- Text — click to place a free-floating text plate and type its text (e.g. “Sauna” or “New railing here”). Text plates are drawing aids: they stay out of reports and the defect list but show in share links and the shareholder view. Edit the text by selecting the plate (the title field); move it by dragging.
- Pen — draw freehand by holding the mouse button (or your finger) down, e.g. a quick outline or an arrow during a site walk. The line is smoothed automatically. Like text plates, pen drawings are drawing aids: they stay out of reports and the defect list but show in share links and the shareholder view, can be moved by dragging and stacked with the Bring to front / Send to back buttons.
Tools also switch with the V / A / P / M / L / T / K keys, and the selected annotation can be removed with Delete (Esc clears the selection, +/−/0 zoom and the arrow keys turn pages).
Changes can be undone and redone: the toolbar arrow buttons or Ctrl+Z (undo) and Ctrl+Y or Ctrl+Shift+Z (redo) revert creating, moving, resizing and restyling annotations as well as deleting them — a restored annotation brings its notes and photos back with it. The history is per document and clears when you switch documents or restore from version history.
A selected annotation can be moved by dragging — a pin, an area or a whole polygon — and a selected rectangle resized from its corner handles. Dragging anywhere else (or over an unselected mark) still pans the view, so marks never move by accident. An annotation’s colour can be changed afterwards in the edit panel’s Appearance section; pins can also change shape and size.
A polygon’s shape can be edited afterwards: select the annotation and its corner points appear — drag a point to move it, click an edge to add a new point, and double-click a point to remove it. A rectangle area can be converted to a polygon with the Convert to polygon button in the edit panel.
Overlapping annotations can be reordered: select an annotation and use the Bring to front / Send to back buttons in the Appearance section (keys ] and [). This brings, for example, a smaller mark hidden under a filled area back into view. The order carries over to share links and the shareholder view.
Annotations with attached photos show a small camera badge with the photo count right on the drawing — observations with photo documentation stand out at a glance. Open the photos by selecting the mark (the image strip in the edit panel).
Multi-page documents can show page thumbnails along the left edge of the viewer (open and close with the edge arrow tab). Each thumbnail shows the page number and how many marks the page carries, and clicking jumps to the page — large drawing sets browse quickly this way. The preference is remembered, and thumbnails work in share links and the shareholder view too.
Page note
Section titled “Page note”The toolbar’s Page note button creates a named note that concerns the whole page without a specific region — for example “General observation about tiling work”. A page note doesn’t draw on the floor plan, but it shows in the Annotations list with a document icon, takes a note and tags like any other annotation, and is included in reports with its own ID. The Annotations list is now grouped by page (Page 1 · 3 headers), so observations in a multi-page document stay organised.
Each annotation can carry a label, multiple notes and tags, and can be marked done — a completed mark renders dimmed on the plan. Notes are added one at a time in the annotation’s edit panel (e.g. one finding at a time during a walk-through), and each note can be checked off individually. If a note has its own location marker and defect number (e.g. imported from the old tool), they render on the floor plan as a numbered marker. An area can also be shown as a plain outline without fill (the Outline toggle in the edit panel). The Annotations panel on the right lists every mark on the page — each row’s icon shows the mark’s shape and colour as drawn on the plan, with a small note count. A click jumps to the annotation and scrolls it into view when needed.
A selected annotation can be isolated with the toolbar’s Isolate button — the floor plan then shows only the selected annotation and its notes, which helps on densely annotated plans. Isolation ends when the selection is cleared.
A document row’s ⋯ menu also lets you rename the document and download the original PDF. At the bottom of the Versions dialog you will find Clear all marks, which removes every annotation and tag in the workspace — a safety version is saved first (note: photos are not preserved).
Measurements and scale
Section titled “Measurements and scale”You can measure real lengths and areas on a floor plan once the document has a scale set:
- Click the toolbar’s Scale button.
- Draw a line over something whose real length you know — for example a door opening (typically 0.9–1.0 m) or the drawing’s scale bar.
- Enter the line’s real length in meters (e.g.
3.5).
After that:
- Lines drawn with the Measure tool (key L) show their length in meters right on the plan — live while drawing, too.
- Areas and polygons show their area in square meters on their
label plate (e.g.
Bathroom · 4.2 m²). - A measurement line’s endpoints can be dragged after selecting it, and the readout updates immediately.
The scale is per page: a scale set on one page covers the whole document until another page gets its own — so mixed-scale drawing sets (e.g. 1:50 and 1:100 in the same PDF) read correctly on every page. When a page’s readouts borrow another page’s scale, the toolbar shows a “Scale from page N” hint. Clear the scale with the ✕ button (removes the scale governing the current page) or reset it by drawing a new calibration line. Measurement lines persist like other annotations and also render in the shared read-only view and the shareholder view, but they are excluded from reports and the defect list — they are measuring aids, not observations.
Note: accuracy depends on the drawing and on how carefully the calibration line was drawn. Always verify critical dimensions on site — the tool is a planning and estimation aid, not a measuring instrument.
Defect list
Section titled “Defect list”The By page | Defect list toggle at the top of the Annotations panel switches the list to a defect list: every note of the current document as one flat list with defect numbers. The All / Open / Checked filters show at a glance what is still unfixed, and a note can be checked off directly from the list. Clicking a row jumps to the annotation on the floor plan.
Text search in the PDF
Section titled “Text search in the PDF”The toolbar’s search button (magnifier) finds text on the current document’s pages — for example a room number or a structure type. Results show the page number and a text snippet; clicking jumps to the page. The search covers the currently open document.
Photos
Section titled “Photos”You can attach photos to an annotation — for example a picture of the moisture damage or the faulty structure. Select the annotation and add photos from the image strip in its edit view. Photos are stored per housing association and are automatically scanned for malware; your own photo shows immediately, one added by someone else appears once the scan completes. Click a thumbnail to view it larger.
Export as a defect report
Section titled “Export as a defect report”You can turn an annotation into a formal defect report in one click: select the annotation and press Export as defect report. The defect creation form opens pre-filled (title and description from the annotation, with the document and page as a source reference). This turns an observation made on a floor plan straight into a defect report with its own lifecycle and deadlines.
Reports and export
Section titled “Reports and export”The Reports menu in the toolbar produces ready-made reports and table exports from a workspace’s annotations:
- Export table — opens a preview of the workspace’s annotations as a table (document, page, type, label, tags, note, status, created date). Choose a flat or grouped-by-document order and optionally restrict the export to the current document. Copy the table to the clipboard (Copy (TSV), paste straight into Excel) or download it as a CSV file.
- Download report (PDF) — the full report: a cover page, every annotated page rendered as a floor plan with its markers, and a findings list with each annotation’s ID, label, note, tags and any photos.
- Download summary (PDF) — a lighter version without photos, plus a separate General findings overview of all annotations.
- Download floors + TSV — a per-floor report with large markers, one page per annotated floor plan, plus a TSV file keyed by annotation ID (d1, d2, …).
Each annotation gets its own ID (d1, d2, …) that appears on the floor plan, in the findings list and in the TSV — so a marker on the image is easy to find in the list. All reports are generated in the browser; nothing is sent anywhere.
On the Tags tab you create reusable, colour-coded tags (e.g. “Moisture”, “Electrical”, “HVAC”). Tags give related annotations a consistent colour and group them in the list — the state of the whole workspace becomes visible at a glance.
Tags can be managed afterwards: rename one from the pencil icon (the new name automatically updates every annotation carrying the tag) and change its colour by clicking the colour dot. An annotation’s tags now also show as coloured chips on the Annotations list rows.
Filtering
Section titled “Filtering”The filter field at the top of the Annotations list narrows the list by free text — matching the label, the note, and tags. The tag toggles below it narrow the list to annotations carrying all the selected tags. Filtering only affects the list (the floor-plan markers always stay visible) and can be cleared with the ✕ button.
Sharing
Section titled “Sharing”A workspace can be shared with a read-only link — for example with a contractor, the property manager or an outside expert — and opening the link requires no sign-in. Click the Share button in the toolbar:
- Create link — optionally name the link (e.g. “For the contractor”) and press Create link. Copy the address with the Copy button.
- The recipient sees the workspace’s documents, annotations, notes and tags — but cannot edit anything or see any other association content.
- Revoke link — the same dialog lists every active link; a revoked link stops working immediately.
Only share content the recipient is allowed to see: the link holder also sees the notes attached to annotations.
Version history
Section titled “Version history”You can save named versions of a workspace’s annotations and tags with the Versions button in the toolbar — for example before a big edit or a meeting. A version can be restored at any time: restoring replaces the workspace’s current annotations and tags with the version’s contents (documents are untouched, and a safety version of the current state is saved automatically first). Note that photos attached to annotations do not survive a restore. The system keeps the 30 most recent versions per workspace.
Mobile use
Section titled “Mobile use”On a small screen (phone, narrow window) the side panels step aside and the PDF fills the whole screen. Two buttons sit above the toolbar: Documents opens the workspace and document list and Marks opens the annotation panel over the PDF — the panel closes when you pick a document or an annotation, tap outside it, or press Esc. The toolbar condenses to icons (names show on long-press). You can pinch with two fingers to zoom the drawing (in any tool) and drag with a finger to pan when the Select tool is active — a tap still selects an annotation as before. On a computer the view is unchanged: documents on the left, annotations on the right.
Sharing with shareholders and their observations
Section titled “Sharing with shareholders and their observations”The board can show a workspace to the association’s shareholders: open the workspace’s ⋯ menu and choose Show to residents. In a shared workspace, shareholders see the documents and all board marks, and can add their own observations — a pin on the drawing or a page note — for example to mark the location of a fault. A shareholder’s own observations are visible only to them and the board, never to other shareholders. In the board’s view, resident observations carry a Resident badge and can be turned into an official defect report with Export as defect report. Sharing can be ended at any time with Hide from residents — resident observations are kept and reappear if the workspace is shared again.
The old tool
Section titled “The old tool”The tool was rebuilt in July 2026: the new version stores everything in VAREK, scoped per housing association, instead of the browser’s local storage. The old tool has been retired and its share links no longer work — re-share the workspace with the Share feature described above.
See also
Section titled “See also”- Document management — the association’s shared document archive.
- Reporting a defect — the formal defect register with lifecycles and deadlines.